As music teachers, most of us have had to start from scratch with new students, teaching note names, grand staff navigation, line and space patterns, and the connections between notation and sound. This can be a daunting and time-consuming task with most methods of music literacy instruction because patterns and connections are difficult to discern for students who are unfamiliar with them.
Memorizing note names isn’t so bad, but connecting those names to the lines and spaces of the staff and associating the sound of each note with its name are complex processes. If you’ve got brand-new students who don’t read music yet and you’re tired of traditional methods, try this fresh take on teaching them how to recognize lines, spaces, and note names.
Preparation
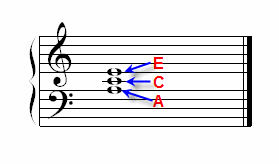
 Take a moment to consider the power of the notes A, C, and E. They form a chord that includes Middle C, creating an excellent “landmark” on the staff and keyboard. The “ACE” chord also includes both the lowest and highest notes on the keyboard, the acronym is easy to say and remember, and every note on the keyboard is either part of an ACE chord or is a “neighbor” note.
That is, the other notes of the scale can be taught as “ACE neighbors” once your students have learned to recognize the ACE chord: G, B, D, and F are each adjacent to one or more notes of the ACE chord. The visual pattern of the ACE chord on the staff is also a great way to teach lines and spaces.
Instruction Method
First, you’ll need a worksheet that shows at least one octave of the keyboard from A to A in order to represent the middle of the keyboard as you teach Middle C recognition. While you’ll be able to teach the grand staff soon after you teach note names on the keyboard, don’t try both at the same time or your student will probably get confused.
Begin by explaining that every note on the keyboard has a name, then “introduce” your student to Middle C with a fun statement like, “Mr. Middle C, meet Jessica. Jessica, this is Middle C. Can you guess how he got his name?”
Explain that Middle C represents the center of the keyboard and that it’s a very helpful landmark to use if students ever get “lost.” Ask your student to write a “C” on the correct key of your keyboard worksheet.
 Show your student that you can find any C on the keyboard by looking for a group of two black notes above and three black notes below. Have your student circle these groups of black notes on the keyboard worksheet. You can also explain that Cs can be found from Middle C by counting up or down seven keys. Practice finding all the Cs on the keyboard with your student.
Next, explain that Middle C is part of an ACE group and introduce A and E. Show your student that by putting Finger 3 on Middle C, Finger 1 is on A and Finger 5 is on E. Sing the notes in the chord with your student, playing and singing “A, C, E” several times. You can also play the sequence twice, singing “1, 3, 5. A, C, E.”
Ask your student if he or she notices a pattern on the keyboard when playing A, C, E. Explain that A and E are both two keys away from C, then ask your student to write “A” and “E” on the correct keys of the keyboard worksheet.
Practice finding all of the ACE groups on the keyboard, singing your number and letter sequences several times for each.
Write this exercise on your student’s assignment sheet and start preparing to introduce the grand staff with its lines and spaces at the next lesson.
Bio: Maria Rainier is a freelance writer and blog junkie. She is currently a resident blogger at First in Education, researching areas of online degree programs. In her spare time, she enjoys square-foot gardening, swimming, and avoiding her laptop.
